Unlock the Sweetness: Easy 5-Minute Homemade Strawberry Banana Fruit Leather
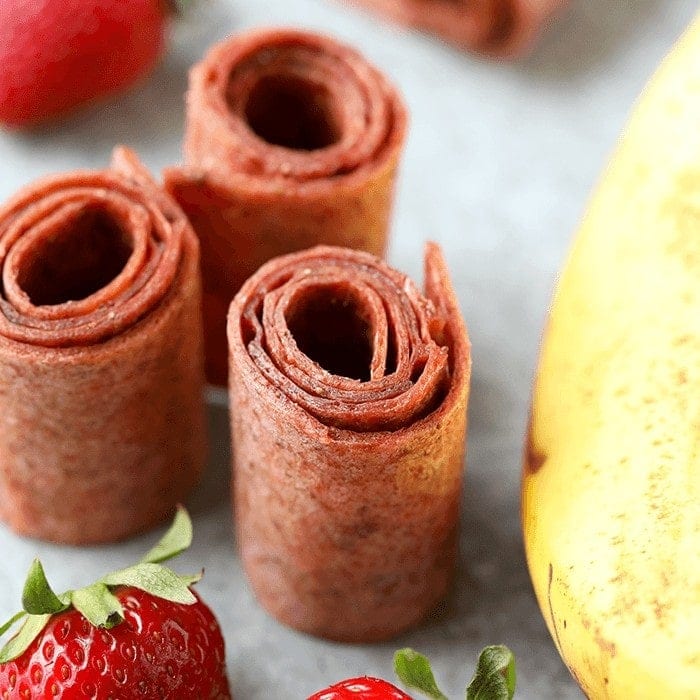
Imagine a wholesome, delicious snack that takes mere minutes to prepare, offers a burst of natural fruit flavor, and is entirely free from artificial additives. Sound too good to be true? Not at all! We're talking about **homemade strawberry banana fruit leather**, a delightful treat that’s incredibly simple to make and perfect for anyone seeking a healthier alternative to store-bought fruit roll-ups. With just about 5 minutes of active preparation, you can set the stage for a stack of vibrant, chewy fruit leather that will revolutionize your snack game.
This article dives deep into crafting the classic strawberry banana fruit leather, a combination so beloved for its perfect balance of sweet and tangy. Whether you’re packing school lunches, fueling a hike, or simply craving something sweet without the guilt, this recipe is your answer. For those who learn best visually, imagining a **video homemade strawberry banana fruit leather** tutorial makes the entire process even more accessible, guiding you through each effortless step to perfect, richly flavored results.
Why Choose Homemade Strawberry Banana Fruit Leather? The Healthier, Tastier Snack Revolution
In an age where processed snacks line grocery store aisles, making your own fruit leather stands out as a beacon of healthy eating. The benefits extend far beyond just satisfying a sweet tooth; they encompass nutritional value, ingredient control, and unparalleled flavor.
Beyond the Label: A Healthier Alternative
The most compelling reason to make your own fruit leather is the stark contrast to commercial versions. Store-bought fruit roll-ups often contain a troubling list of ingredients: high fructose corn syrup, artificial flavors, dyes, and preservatives. When you make **homemade strawberry banana fruit leather**, you sidestep all of these. Your fruit leather will be pure fruit, perhaps with a touch of natural sweetener if desired, but certainly free from anything questionable. This makes it an ideal healthy snack for kids and adults alike, ensuring you're fueling your body with real, unadulterated goodness. It's also a fantastic way to utilize overripe fruit that might otherwise go to waste, transforming it into a nutrient-dense, portable snack.
Customization and Convenience at Your Fingertips
One of the greatest joys of preparing food at home is the power of customization. This recipe is incredibly versatile. While strawberry banana is a timeless classic, you can experiment with countless other fruit combinations once you master the basic technique. Want it sweeter? Add a drizzle of honey or agave. Prefer a tart kick? Increase the lemon juice or incorporate more tart berries. You can also dictate the thickness and how you cut your fruit leather – from whole sheets to fun strips or shapes. This level of control ensures your snack perfectly aligns with your personal preferences every single time.
Moreover, homemade fruit leather is incredibly convenient. Once dried, it’s shelf-stable and easy to store, making it a perfect grab-and-go option for lunchboxes, pre- or post-workout fuel, road trips, or just keeping on hand for those inevitable sweet cravings. It’s an energizing, satisfying snack that travels well and requires no refrigeration, fitting seamlessly into a busy lifestyle.
The Magic of 5-Minute Prep: Ingredients You'll Need
The "5-minute" promise isn't an exaggeration; it refers to the active prep time required to blend your ingredients. The rest is passive drying time, letting your dehydrator or oven do the work. The beauty of this recipe lies in its simplicity, utilizing only a handful of readily available ingredients.
Fresh Fruit: The Star Performers
The foundation of spectacular strawberry banana fruit leather begins with excellent fruit. You'll need:
* **Fresh Strawberries:** Opt for ripe, vibrant red berries. While fresh is ideal, thawed frozen strawberries work just as well, especially if they were picked at peak ripeness.
* **Bananas:** This is where *overripe* fruit truly shines. Those spotty, brown-speckled bananas you might otherwise discard are perfect for fruit leather. They are naturally sweeter and blend into a smoother puree, which is crucial for a perfectly textured leather. The drying process concentrates flavors, so starting with sweet, ripe fruit ensures a deliciously intense taste. Aim for roughly 3 cups of fruit puree in total for a standard batch.
Lemon Juice: Brightness and Prevention
A crucial, often overlooked, ingredient is lemon juice. Its role is twofold:
* **Prevents Browning:** Bananas, when exposed to air, oxidize and turn brown. Lemon juice, with its ascorbic acid, acts as a natural antioxidant, keeping your fruit leather vibrant and appealing.
* **Brightens Flavor:** A touch of lemon juice adds a subtle, refreshing tang that balances the sweetness of the fruit, elevating the overall flavor profile. If you don’t have fresh lemons, ¼ teaspoon of citric acid is an excellent substitute, providing the same benefits.
Sweetener (Optional) & Salt: The Supporting Cast
* **Natural Sweetener (e.g., Honey or Agave):** With overripe fruit, you might find you don't need any added sweetener at all. However, if your fruit isn't as sweet as you'd like, or if you simply prefer a richer taste, a tablespoon or two of honey or agave can be added. This is entirely to your personal preference, offering another layer of customization.
* **A Pinch of Salt:** A tiny dash of salt might seem counterintuitive in a sweet recipe, but it works wonders. It enhances the natural sweetness of the fruit and helps to balance the flavors, preventing the fruit leather from tasting one-dimensional.
These five simple ingredients, when combined thoughtfully, create a snack that's both healthy and irresistible. For a deep dive into this exact approach, check out our
Healthy Homemade Strawberry Banana Fruit Leather: 5-Ingredient Recipe for more details.
Equipment for Success: Dehydrator vs. Oven Methods
While the ingredients list is minimal, having the right equipment ensures your fruit leather turns out perfectly every time. The primary method involves a food dehydrator, but an oven can also be used with great results.
The Food Dehydrator: The Easiest Path to Perfection
A food dehydrator is undoubtedly the easiest and most efficient way to make fruit leather. It provides consistent, low heat, gradually removing moisture without "cooking" the fruit.
* **Dehydrator Trays:** Most dehydrators come with solid trays or mesh screens. For fruit leather, you'll want solid trays or silicone inserts to prevent the puree from dripping through. Alternatively, parchment paper cut to fit your trays works perfectly.
* **Process:** Simply spread your fruit puree evenly onto the prepared trays. The dehydrator then works its magic over several hours, transforming the liquid puree into a pliable, chewy leather. If you're new to dehydrating, finding a good **video homemade strawberry banana fruit leather** guide can be incredibly helpful for visualizing the setup and process. It demonstrates how to spread the puree for even drying and how to tell when it's perfectly done.
Oven Method: No Dehydrator? No Problem!
Don't have a dehydrator? No worries! You can absolutely make excellent fruit leather using a conventional oven. This method requires a bit more vigilance, but it’s completely doable.
* **Baking Sheets & Parchment Paper:** Line standard baking sheets with parchment paper or silicone baking mats. This prevents sticking and makes peeling off the finished leather a breeze.
* **Low Heat & Time:** The key to oven-dried fruit leather is very low heat (typically 140-170°F or the lowest setting your oven allows) and a long drying time. You often need to prop the oven door slightly ajar to allow moisture to escape. For a detailed guide on how to achieve this without specialized equipment, we highly recommend our article on how to
Make Healthy Strawberry Banana Fruit Leather Without a Dehydrator. This article provides all the tips and tricks for successful oven drying.
Basic Kitchen Essentials
Beyond the primary drying equipment, you'll need a few common kitchen tools:
* **Blender or Food Processor:** Essential for achieving that silky-smooth fruit puree.
* **Spatula:** For spreading the puree evenly on your trays or baking sheets.
* **Measuring Cups and Spoons:** For accurate ingredient quantities.
Step-by-Step: Crafting Your Strawberry Banana Fruit Leather (The 5-Minute Puree)
Now for the exciting part – bringing it all together! The actual hands-on work is so quick, you'll wonder why you haven't been making this all along.
1. Prepare Your Fruit Puree (The 5-Minute Dash)
Begin by washing and hulling your strawberries. Peel your overripe bananas. Combine the fresh strawberries, peeled bananas, lemon juice (or citric acid), optional sweetener, and a pinch of salt in your blender or food processor. Blend until the mixture is absolutely silky smooth. There should be no chunks of fruit remaining. This step takes most of your active "5 minutes" and is crucial for a consistent, chewable fruit leather. Watching a **video homemade strawberry banana fruit leather** walkthrough can clarify the texture you're aiming for before and after drying.
2. Spread Evenly
Prepare your dehydrator trays by lining them with parchment paper or silicone mats, or use your oven baking sheets similarly. Pour the fruit puree onto the prepared surfaces. Using an offset spatula or the back of a spoon, spread the puree evenly. Aim for a thickness of about ⅛ to ¼ inch. Thinner layers will dry faster but can become brittle, while thicker layers will take longer but result in a chewier leather. Try to achieve an even thickness across the entire sheet to ensure uniform drying.
3. Dehydrate or Bake
* **Dehydrator Method:** Place your trays into the dehydrator. Set the temperature to around 135°F (57°C). Dehydrating time can vary widely depending on your machine, humidity, and the thickness of your puree, typically ranging from 6 to 12 hours.
* **Oven Method:** Place your baking sheets in your preheated oven at its lowest possible setting (140-170°F / 60-77°C). Prop the oven door open slightly with a wooden spoon to allow moisture to escape. This method can take anywhere from 3 to 8 hours or even longer.
4. Check for Doneness
Your fruit leather is ready when it's no longer sticky to the touch and peels easily from the parchment paper. It should be pliable and leathery, not brittle or gooey. It might still be slightly tacky, but not wet. The edges usually dry faster than the center, so check the middle for doneness.
5. Cut and Store
Once completely cool, peel the fruit leather from the parchment paper. You can then cut it into strips, roll it up with the parchment paper still attached for easy storage, or use cookie cutters to make fun shapes. Store your **homemade strawberry banana fruit leather** in an airtight container at room temperature for several weeks, or in the refrigerator for longer freshness.
Conclusion
Making your own **easy 5-minute homemade strawberry banana fruit leather** is a remarkably rewarding experience. It's a simple, cost-effective way to provide healthy, delicious snacks free from the hidden sugars and preservatives found in commercial products. With minimal active prep time and the power of a dehydrator or even a conventional oven, you can transform fresh, ripe fruit into a chewy, flavorful treat that kids and adults alike will adore. So go ahead, gather your ingredients, take those few minutes to blend, and embark on a journey to a healthier, tastier snack drawer!